INTRODUCTION
Because each set of jewels is randomly generated and there are many different ways to clear each board, there is no one set of instructions for each round. However, there are many tips and tricks that can help you get through this very challenging, but very enjoyable, match game.
In Jewel Quest III, you will move through “Regions” of the world, playing different Jewel Board games. In order to progress, you will have to eventually go through each Region twice—first to complete the “Silver Quests,” and then to complete the “Gold Quests.”
In addition, there is a “Hidden Quest” in each Region that must be completed before you can start on the Gold Quests there. If you don’t complete it during the Silver Quest phase, you’ll have to go back into the Region and complete it before you will be allowed to start on the Gold Quests.
One of the tricky things about the game is that there is a specific Quest Sequence in which you’re supposed to do these things. However, because you are allowed to complete the Hidden Quest for a Region at any time before you start the Gold Quests there, the game will let you re-enter a Region you had already started, even though it really expects you to be working in a different Region. This sometimes leaves players confused about why they aren’t making progress.
This strategy guide will begin with an explanation of the Quest navigation for the game as a whole. Then we will discuss the gameplay in each Region. The Hidden Quests will be revealed in the Spoilers section at the end.
Quest Navigation
The simplest way to go through the game is:
• Locate the Region that says “Quest” in silver letters.
• Enter it and complete all the Silver Quests there.
• Continue with the next Region that is labeled Quest, and work on all its Silver Quests.
• After you have completed all the Silver Quests in all Regions, the globe will mark one of the Regions you already did with the word Quest in gold letters.
• Find a Region that has the words "Hidden Quest" next to it. Click on the Region dot. Enter the Region. Choose any Location and read the Location diary carefully. It will have changed. In the lower right it will now give you the exact instructions for the Hidden Quest..
• Go into that Region and complete the Hidden Quest.
This will “unlock” the Gold Quests for that Region.
You can then complete the Gold Quests in that Region. (Note that a few regions won’t unlock right away, because you do something in a different Region first. Just always look for the word “Quest” and you’ll know you’re working in the right Region.)
• Continue the game by looking for the Quest region.
• Complete each Region’s Hidden Quest and then its Gold Quests.
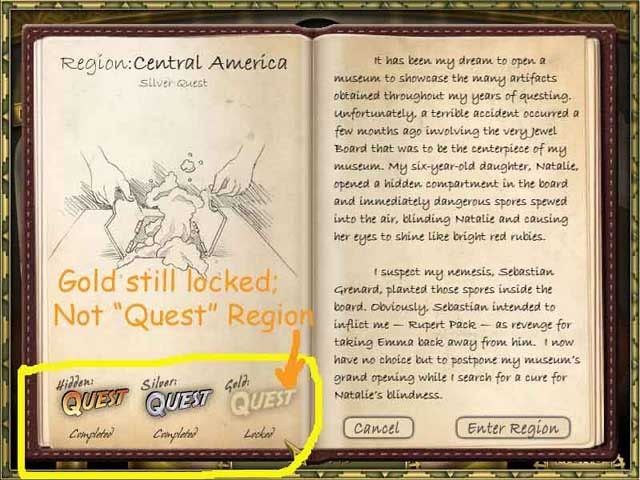
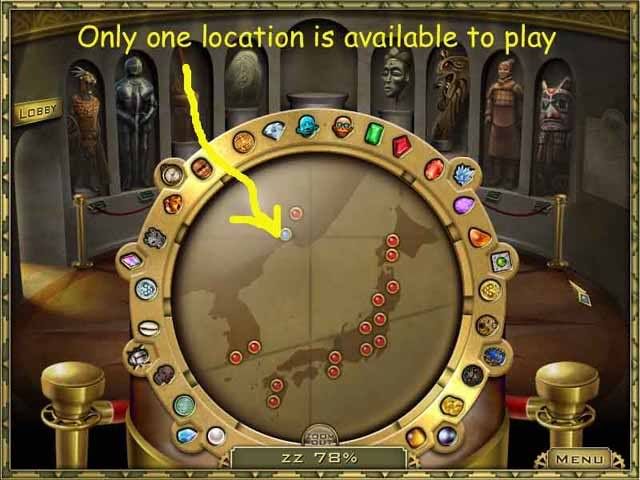
• If you enter a Region which is not marked with the word Quest, the game will still let you play, but you may not be able to make progress. The Region diary page will always tell you what you can do in the Region. (See picture.)

Once you have completed all the Gold Quests in the first 8 regions, a new Quest Region, East Asia, will open up. It has only Gold Quests.
Complete its quests and a bonus Region, Hawaii, will open for play.
If you follow these instructions, you will always know where you should be playing and what you should be doing.
If you prefer, you can try to figure out the Hidden Quests from the hints you get on the diary pages during the Silver Quest phase, and you can keep going back into a Region to replay the Silver Quests and try and complete the Hidden Quest. But it’s not necessary. Once you complete all the Silver Quests, the Region’s diary pages will change and you will get exact instructions for the Hidden Quest.
Bonus tip: If you need help finding the next Quest region, just go back out to the lobby and then re-enter the map room. The globe will automatically position itself to the Quest region and you will know where to go next.
GENERAL TIPS
Quickplay vs Strategic Play
Make no mistake about it—some levels in this game are very hard. And you are going to have to be quick at making matches in order to get through some of the locations.
Still, there are a lot of strategic choices that can help, too. In the Region sections we discuss the best strategy. Because the gameplay differs from Region to Region, the strategy will differ, too.
• Important Note: On every board, whether you are working on a Silver Quest, Hidden Quest, or Gold Quest, you must turn all spaces gold to complete the location in addition to any other requirements.
• If you hold down the CTRL key and the Left SHIFT key at the same time, you will see the board without the jewels. This will let you quickly find any stray squares that aren’t gold yet.
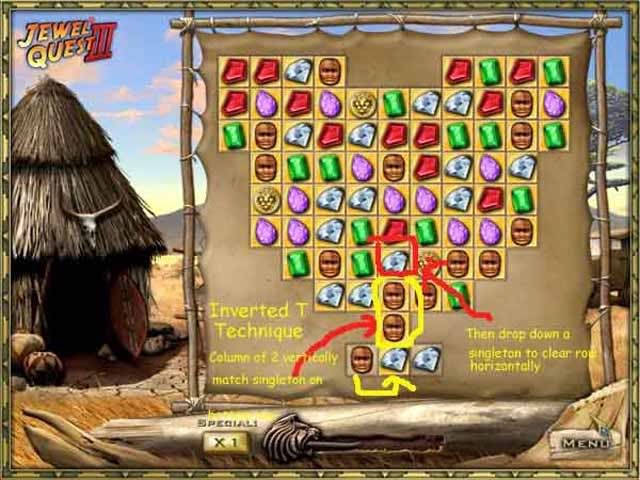
• Standard play is match 3. You’ll need to know how to clear odd shapes, including inverted T’s. See the picture for a reminder of this technique.

• To clear a single square jutting out vertically, make a vertical match with it. To clear a single square jutting out horizontally, make a horizontal match with it.
Region 1: Central America (Gold Aztec coins)
Silver Quests
Basic gameplay: Standard matches.
Special Jewels: Gold Aztec coins. Match 3 coins to open one locked square. Coins will fall off the edge of the board when they reach it. Once the last locked square is unlocked, all the remaining coins will disappear.
Tips:
• Work in one area of the board if you need to match more coins, so that new coins will drop into the area where you already have coins.
• Work the board from the bottom to the top so you get the most chain reactions (unless you’re trying to match a specific set of coins).
• Don’t worry about coins falling off the bottom of the board. In fact, if you have a single coin off by itself you may want to drop it off the board so you can get new ones at the top that will be easier to match.
Gold Quests
Basic gameplay: Standard matches. Some locks have two chains.
Special Jewels: Gold Aztec coins. Match 3 coins to break one set of chains on one lock.
These quests also have Angry Crows. These are similar to the monkeys from the China silver quests. If a match is made just by crows falling next to each other, the gold squares will stay gold. However, if you move a crow to where it makes a match, then any gold squares under the crows in the match will turn grey.
However, unlike monkeys, angry crows do not drop off the edge of the board when they reach it—they’ll just sit in the last row like any other jewel.
Tips:
• When you start a location, first clear any locked squares by making coin matches. Ignore the crows and any gold squares. Just match coins as quickly as possible until all the locked squares are gone. Then you can play to turn squares gold and treat the crows more carefully.
• As time winds down, watch out for the angry crows! There will be a lot of them, and you can use up a lot of time changing squares back to gold. Try to make matches between crows so they will fall into each other rather than you moving them into a match.
• The Gold Quests in Central America will stay locked until you have completed the Silver Quests in Africa and earned the angry crow jewel there.
Region 2: Iceland (Iceblocks)
Silver Quests
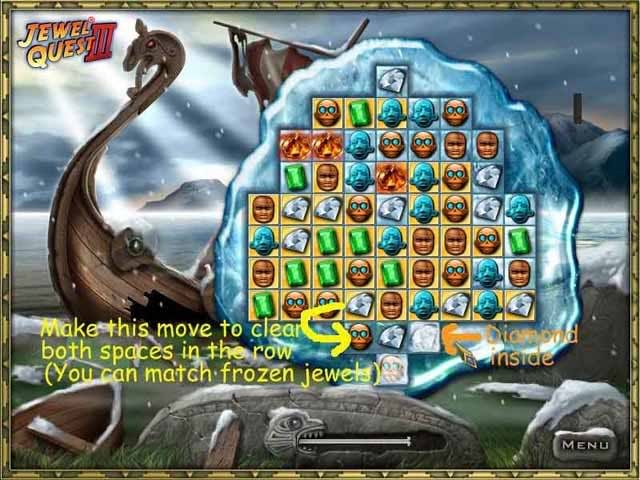
Basic gameplay: Standard matches except that a warming jewel can be slid one square over next to an ice block without making a match. Note that you can make matches with the jewels inside of iceblocks, but it won’t remove the ice.
Special Jewels: Warming jewels. When placed next to an ice block, they will melt the block. One jewel can warm two blocks at once. When a warming jewel gets to the edge, it burns up (basically the same as falling off). When you melt the last iceblock on the board, all the remaining warming jewels burn up.
Tips:
• Remember you don’t need an exact match to line up a warming jewel with an iceblock—as soon as you’re one square away, you can just slide it over. (See picture.)

• Make matches with the jewels inside the iceblocks to move other jewels down the board or turn more spaces gold. You won’t melt the ice, but you will clear the other two jewels in the match. (See picture.)

• Don’t be afraid of moving a warming block into the bottom row of the board if it’s next to an iceblock—it will still melt the iceblock before it falls off the board.
Gold Quests
Everything is the same as the Silver Quests, just more difficult board layouts.
Iceland: Hekla's Gold Quest
- If you have trouble with Hekla's Gold Quest, use this 4 step method. 1st, restart the board until you have two jewels of the same color at the bottom of each of the outermost columns, like 2 reds on the left and 2 greens on the right. 2nd, move warming jewels down the board to unfreeze all the iceblocks in the outermost columns. Do not match the bottom jewel before it is unfrozen! 3rd, move in a jewel to match the bottom two jewels in the column. Repeat these first three steps on the opposite side of the board. Then 4th, clear any remaining squares. (See picture.)

Region 3: South America (Duel on a Shared Board)
Silver Quests
Basic gameplay: Standard match play. You and your opponent (Hani or Emma) will alternate turns playing on the same jewelboard. The first one to a specific point target wins the round.
Special Jewels: No special jewels.
Tips:
• Take a little time to find the best play. In particular, look for plays where switching two jewels completes two matches (6 points) or T and L shapes where one jewel can give you 4 or 5 points. If you have time, try to look ahead to see if additional matches will fall into place.
• Work the board from the bottom up to take advantage of chain reactions. Specifically choose areas where the top part of the board is still brown, not gold.
• Keep track of the points goal (it’s in the upper right corner of the screen) so you know when you’re getting close. If you’re very close to goal you can use more time to find the best play.
• Take advantage of being ahead if the board is almost full and you only need another point or two. Say the goal is “first to 34 points” and you have 33 and Hani has 28. Almost all the squares on the board are gold. It’s OK to take a risk and make a match right near the still available squares so more jewels fall in that area. Even if you do end up giving Hani a match for his next turn, hopefully there will still be one more new match for you, too—and one more square is all you need.
• Conversely, if you fall behind your opponent or you are both about equal and there are no matches left, make your matches on gold squares far away from the brown squares, and hope that Hani makes a mistake and ends up creating an available match for you.
• Don’t pay too much attention to the suggested move hints from the game—you can often find a better move on your own.
Gold Quests
Basic gameplay: the same as the Silver Quests, except you duel against Sebastian, who is a stronger opponent.
Special Jewels: No special jewels.
Tips:
• Check the score at the end of your first turn. If you’re not ahead of Sebastian by at least 6 points now, you may want to just restart—it’s extremely unlikely that you will be able to beat him. Since Sebastian always goes first, he gets a big advantage, and there are many rounds when you just can’t overcome that against a player as good as he is.
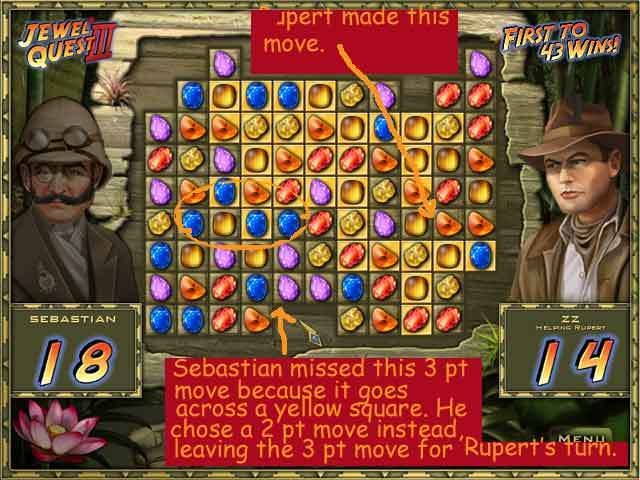
• Look for potential matches that involve moving a jewel across gold squares. Sebastian seems to have a little trouble seeing these, particularly when they’re horizontal, and he often skips them. For example, if a turn offers one straightforward 3 jewel match on 3 brown squares and one that requires moving across gold squares, make the brown square match first so Sebastian doesn’t use it on his turn. He may not see the other one, and make a worse match on his turn. This is particularly important later in the game.

• Don’t get discouraged! About every 4th attempt, Sebastian just doesn’t play quite as well. He’ll miss even a simple 4 jewel match and make a 3 jewel match instead. If you’ve been having trouble on a particular Location, just use restart until you are at least 5 points ahead of him after the first turn.
Region 4: Europe (Duel on Separate Boards)
Silver Quests
Basic gameplay: Standard match play. You and your opponent (Hani or Emma) will play on your own separate jewelboards. The first one to turn all the spaces gold on their jewelboard wins.
Special Jewels: No special jewels.
Tips:
• Work the board from the bottom up to take advantage of chain reactions. Specifically choose areas where the top part of the board is still brown, not gold.
• Don’t pay too much attention to the suggested move hints from the game—you can often find a better move on your own.
Gold Quests
Basic gameplay: the same as the Silver Quests, except you duel against Sebastian, who is a stronger opponent. Everything else is the same as the Silver Quests.
Region 5: Africa (Gold Lion Coins and Special Moves)
Silver Quests
Basic gameplay: Standard matches except that when you match coins you earn “Special” moves. With a special move you can clear any one square on the board.
Special Jewels: Gold Lion Coins. Matching 3 coins earn you a “Special move.” To use a Special, click on the Special counter in the lower left, then on the square you want to turn gold. The jewel on that square will disappear and the square will turn. Coins fall off the edge when they reach it.
If you use a Special on a square that is already Gold, it will stay Gold, but the jewel that was there will be removed.
Tips:
• Work the board from bottom to top to take advantage of chain reactions, except when you’re trying to match coins.
• However, if you need more Specials, do make a lot of matches all in one area near the top quarter of the board so more coins will drop there.
• Each location can only have 5 coins at a time, so if you have one off by itself you may want to drop it off the board so you’ll get a new one that’s easier to match.
• Don’t spend too much time trying to match a coin that’s way off by itself—just drop it off the edge and get a new one.
• Do use a Special move to create movement if you’re stuck, even if you don’t need it to turn that square gold. This is especially helpful in some of the Gold Quests where the layouts are really tricky. (See picture.)

Gold Quests
Same as the Silver Quests except the layouts are more difficult.
Region 6: Oceana (Silver Lion Coins)
Silver Quests
Basic gameplay: Standard match play.
Special Jewels: Silver Coins. You will have a goal for each location to collect a certain number of coins (you collect them by matches). When you reach that goal, any locked squares on the board will be unlocked. Remember you also have to turn all squares gold to complete the Location.
Tips:
• Mentally divide the board in half. Start by trying to collect half the Coins goal in one half of the board. (For example, if you need to collect 100 coins, start by trying to get 50 coins on the left side of the board.) As soon as you reach the half way mark, switch to the other half of the board and collect the second half of the coins over there. This will make the best use of your time.
• Since what counts is the total number of coins, not the number of matches, go ahead and make matches with as many coins at a time as you can. 4 is getter than 3, 5 is better than 4.
• Don’t work on turning squares gold until you’ve collected all the coins you’ll need. Collecting coins will turn a lot of squares gold anyway. And once you can get past the locked squares, you’ll find making matches easier.
• If you forget how many silver coins you need for the location, click on MENU and REVIEW GOAL.
Gold Quests
Same as the Silver Quests except the layouts are more difficult and some locks have two chains.
Region 7: China (Ack! Monkeys!)
Silver Quests
Basic gameplay: Standard match play, except for those darn monkeys! When you make a match of monkeys, they turn any gold squares underneath them back to grey.
Special Jewels: Monkeys! They move and make matches like regular jewels except for the problem of turning gold squares grey. However, if the monkeys simply fall into a match, the square won’t change color. It is only when you actively move a monkey into a match that the square will change.
If monkeys get to the edge, they fall off.
Tips:
• Plan ahead! Remember that any time there are three monkeys in a horizontal row, they make a match even if some of the monkeys are in cages. A match will release any caged monkeys. So if you have to put monkeys in cages separated by only one column, you need to keep any new monkeys from falling onto the space between them, or both caged monkeys go free.
• Study the board layout on the diary pages before starting the round. The trick isn’t getting monkeys into the cages—it’s keeping them there. Try to decide early whether you want to fill high or low cages first.
• Don’t be afraid of matching monkeys higher on the board and turning some squares back to grey if it prevents a match that would let a caged monkey escape. It’s almost always faster to turn a few squares back to gold than it is to catch another monkey in the cage.
• Chain reaction monkey-matches won’t hurt you—only matches that you make with the cursor will turn gold squares back to grey.
• You can make matches in between monkeys to create chain reaction matches and get rid of them.
• Look for opportunities to move monkeys sideways into columns that will lead to cages.
• Often the easiest way to move monkeys towards cages is with vertical matches. (See picture.)

Gold Quests
Everything is the same as the Silver Quests, just more difficult board layouts.
Tips:
• There are a limited number of monkeys, so you may need to let some fall off the edge or make monkey matches if you need some in a different part of the board.
• In general, fill cages that are close together from the lowest cage to the highest to avoid matches that will let the monkeys escape. Cages that are off by themselves on the side can be filled anytime.
• An exception to the lowest to highest pattern is if there are two monkeys stacked vertically right next to two empty cages. In that case, put the top monkey in first. (If you put the lower monkey in first, the top one drops down and you can't put it in the cage.
Region 8: North Pacific (White Pearls)
Silver Quests
Basic gameplay: Standard matches except that if a white pearl falls off the edge of the board, it will make a new brown space there, which you will then have to turn gold.
If you have problems with pearls getting stuck part way down the board, try working the board from the top down until a pearl falls into a column, and then working the pearl down to where you want it. This will leave more available matches underneath the pearl then if you always work the board from the bottom up.
Special Jewels: White pearls. These can be matched with each other like any other jewel. If a white pearl falls off the edge of the board, it will make a new brown space there. This can be helpful if you’re trying to reach an isolated “island” of squares—or annoying if it creates an odd shape you then have to turn gold.
Tips:
• Keep track of pearls as they get near the edge. If you need to reach an “island,” make a lot of matches in the columns above it to get pearls that can fall off the edge and add connecting squares. Otherwise, you may want to match pearls with each other before they get to the edge to keep from adding new squares that just make more work for you.
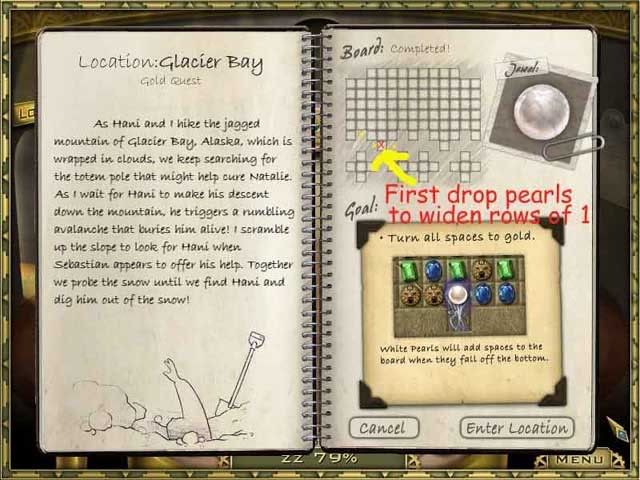
• If you need to reach an island and there is one square jutting out from the main board, do drop a pearl or two off next to it first. You’ll find matches are much easier to make when you have more horizontal squares. (See picture.)
• Don’t drop a pearl off the edge if it will just make more work for you.

Gold Quests
Basic gameplay: the same as the Silver Quests, except the layouts are much harder and you will never have more than 3 pearls on the board.
Special Jewels: White pearls. These work the same as in the silver quest except you will never have more than 3 on the board at once.
• In addition to all the usual rules for white pearls, now you have to deal with the fact that you never get more than 3 of them. Once you’ve connected the islands in one section of the board gold, you won’t need more pearls there. On the other hand, you may find it easier to work with just one pearl instead of all three, especially if you’re trying to make precision connections. So do decide consciously where you want the pearls.
• Don’t stack up two pearls vertically. This will make it very hard to move them!
Region 9: East Asia (8 Different Special Jewels)
Silver/Gold Quests
There are no Silver Quests in this Region, you start right out with Gold. The only Location you can play will have a Silver dot. Locations that are Gold have already been completed. Locations that are Red are still locked. This is the only Region that requires you to play the Locations in a specific sequence.

Basic gameplay: Standard matches.
Special Jewels: You will get a new special jewel after every two regions, so there are 8 special jewels in all. These are the 8 jewels from the outermost ring of the globe.
Locations 1 and 2: Timepiece. Matching 3 will give you extra time—and you’ll need it! You will get many timepieces, so just keep making matches and more will fall on the board. Timepieces move like regular jewels when they make matches or reach the edge of the board.
Locations 3 and 4: Fragile Crystal. These can be matched as pairs or threes, but will selfdestruct when matched. If a fragile crystal is in a box, you can put another right next to it or below it and they will not match, but if you have one right above it, both will self-destruct. They self-destruct when they reach the edge of the board.
Locations 5 and 6: Unswapable green jewels. You cannot move these with the cursor, but they will fall down the board as jewels below them are removed. If they fall into a match, they will self-destruct. They fall off the edge of the board.
Locations 7 and 8: Encased jewels. Must be matched twice to remove.
Locations 9 and 10: Multicolor diamonds. These are the only matches that will turn squares gold in these two locations.
Locations 11 and 12: Silver beetle. These require a match of at least 6 (horizontally or vertically) instead of 3. When they reach the edge of the board, they fly away.
Locations 13 and 14: Unlucky 7. No special jewels, but there are seven different colors instead of the usual 6, so it is harder to make matches.
Locations 15 and 16: Black pearls and white pearls. White pearls work just as they do in the North Pacific—when they get to the edge of the board, they fall off and create a new space. Black pearls work in reverse. When they get to the edge of the board, they destroy a space. (Unlike in the North Pacific, pearls do not sit in the bottommost row, but go ahead and fall off the board.) The white and black pearls are independent. They can be matched with their own color, but not the other one. If a white pearl adds a space, a black pearl can remove it. If a black pearl removes a space, a white pearl can add it back again.
Tips for Locations 1 and 2 (timepieces):
• Although normally I would work a board like this from bottom to top to take advantage of chain reactions, the most important thing here is to be able to make timepiece matches. So I ended up working from top to bottom. Try that if you’re timing out.
• Make a timepiece match whenever one is available. Each will add time, and you’ll need them all.
• Work in an area about the size of ¼ of the board at a time. I would usually pick a timepiece that was already on the board and work near it until I could make a timepiece match, then move on to the next area near a timepiece.
• Match the higher, not the lower timepiece if you have a choice. It’s hard to get enough time to move a timepiece down towards the bottom of the board, but you will need some in that area to complete the lowest rows. So preserve that investment if you don’t need to use it right away.
• Use vertical matches to quickly move timepiecees down the board if needed.
• Any time you can make two timepiece matches in a row, do that, then go ahead and make one regular jewel match somewhere near the bottom of the board. In some locations this is the only way to clear the bottom area.
• If you have a choice between making a match with 3 timepieces or 4, make the match with 3 and leave the other on the board for a future match.
• The background is much lighter in this region, and it can be hard to tell grey from gold. Use the CTRL plus LEFT SHIFT key combination if you can’t tell which spaces still need to be turned gold.
• Keep making matches!
• Don’t panic if you start getting low on time. Just make as many matches as you can quickly in the top 4 or 5 rows of the board (preferably near an existing timepiece) and you’ll probably get enough new timepieces to get more time.
Tips for Locations 3 and 4 (fragile jewels):
• Each location has some empty boxes. You must turn all of the squares of the location gold and fill each box with a fragile jewel to win the location.
• First work on filling all the boxes. Then turn any remaining white squares gold.
• Fragile jewels can be matched as pairs as well as threes. They will selfdestruct when matched.
• Work the first location from left to right, filling one box at a time. Once you have the box in a column filled, either match (to destroy) any new jewels in that column or move them sideways to the next open box.
• In the second location, do the far left and far right columns first, as these are the hardest to maneuver to.
Tips for Locations 5 and 6 (unswapable green jewels):
• If these fall into a match of 3 either vertically or horizontally, they will selfdestruct. Sometimes this is the only way to get rid of them.
• Begin Location 5 by working at the top of the board. Once some unswapable green jewels appear, work on turning squares gold below them so they move down the board. Once all squares below them are gold, go ahead and move to a different section of the board.
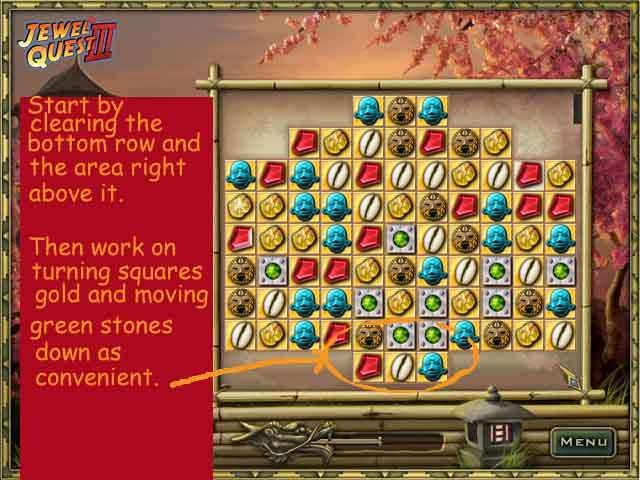
• Begin Location 6 by clearing the row of 3 squares at the bottom of the board, and the squares right above this so you get those done before the green stones block them. Then work like Location 5.

• Concentrate on turning all squares gold. It doesn’t really matter where the green jewels are.
• If you think you’ve finished but you don’t get the COMPLETE message, use CTRL and LEFT SHIFT to see which spaces are still white. There is probably one underneath an unswapable green jewel and you will have to move it to be able to turn the square.
• There are a limited number of unswapable green jewels, although there are quite a lot of them. If you’ve cleared all the squares below them, you may want to just leave them on the board for awhile so you don’t get new ones falling into your way in areas you still have to work on.
• If you find unswapable green jewels blocking an area you can’t clear, you may have to drop unadditional green jewels onto it from above to make a chain reaction match. In that case, just start making matches above the green jewel.
Tips for Locations 7 and 8 (encased jewels):
• Encased jewels must be matched twice to be removed.
• A match with two encased jewels and one regular jewel will clear both encased jewel, so make those first if available.
Tips for Locations 9 and 10 (multicolor diamonds):
• The easiest way to work these boards is just to make a match anywhere a multicolor diamond is on a white space. Then continue working by putting a multicolor diamond on the next white space you want to turn, and work to make a match with it.
• You will usually get the best results if you work the board from the bottom up.
Tips for Locations 11 and 12 (silver beetles):
• Clear the bottom row and any odd squares first, before too many beetles make it more difficult to find moves.
• If necessary, move a beetle horizontally to get it to the edge of the board more quickly.
Tips for Locations 13(unlucky 7):
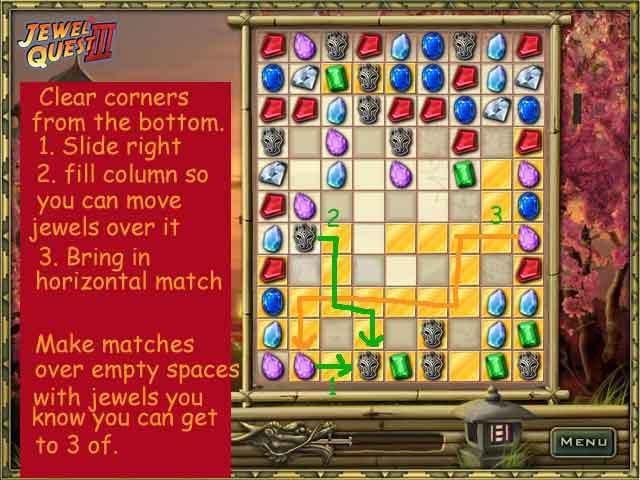
• Clear the bottom row first, then use the Inverted T technique (see General Tips at the top of the strategy guide) to clear spaces.
• Make matches over empty spaces using jewels you can already see 3 of. Don’t count on the right color falling down from above.
• Clear the bottom corners with horizontal matches. (see picture)

• After you’ve turned the spaces gold, fill columns from the bottom up so you can work on top of them.
Tips for Location 14 (Unlucky 7, second location):
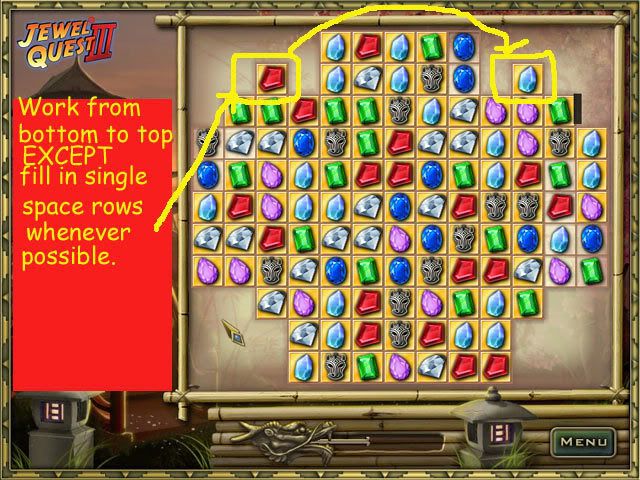
• This is basically just a very large jewel board. Work from bottom to top, except fill the single space rows at the top whenever possible, as these must be filled with falling jewels. (See picture.)

• This is one of the few Locations in the game where the sparkly game hints can be truly helpful, just because the board is so large. So take advantage of them if they occur.
Tips for Locations 15 and 16 (black pearls):
• The white pearls work just as they do in the Pacific Northwest except that they will fall off the bottommost row also.
• Black pearls can be matched with black pearls. White pearls can be matched with white pearls. They do not match each other.
• In general the white pearls are helpful to fill in extra spaces in the middle of the board or next to single squares, but hurt when they fall off the to create a new single square row.
• In general the black pearls are harmful just about everywhere except if there is a single square sticking out, so you may want to just get rid of them by either matching 3 black pearls or pairing a white pearl and a black pearl in a column so they undo the effect of the other.
• If there is an area of the board where all the squares are already gold, a black pearl won’t do any harm if it removes a square there. However, if you then let a white square fall in that area and create a new white square, you may have trouble turning it gold if the black pearls chopped up the board too much.
• You must make one match anywhere on the board for each white square the black pearls destroy. So if you think you’re at the end but you don’t get the “Complete!” message, just make a few more matches—you probably just lost track of how many black pearls you used.
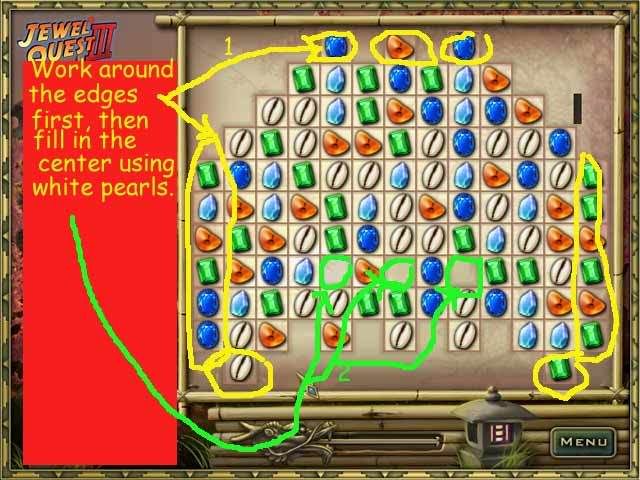
• Work around the edges first, as these become hard to turn gold once there are a lot of pearls on the board. Then use white pearls to fill in the center. (See picture.)

Region 10: Hawaii Bonus Region
This is a bonus region of extreme difficulty puzzles. No special jewels. You’ll need all your jewelboard skills to master these. (I guess that’s a gameplayer’s idea of a great vacation!)
To play the Hawaii locations, wait until you see the family in front of the museum. Click on the entrance. Read the newspaper story, then click CLOSE. When you reenter the map room, the globe will position to the BONUS region.
Tip: Some Gamezebo readers have reported that if they finish all 20 of the Hawaiian Locations, the game freezes and they can no longer replay the game. You may want to play only through Location 19 to avoid this problem.
FUN STUFF/EASTER EGGS
• If you start the game but don’t click on the museum doors right away, a large black car will drive up to the front of the museum.
• In the museum lobby, you can click on the brochures in the stand on the left and read more about the game.
• You can click on the spaces around the edge of the map to learn more about the jewels you’ve already won and the ones you’re going to win. There are no hints here—it’s just added detail. Here’s what you see if you click on the angry crow jewel you will earn in Africa for completing the Silver Quests there.

• You can also click on the items in the alcoves around the edge of the room. Again, no hints—just more detail to fill in the “story” of the game.
• When you are playing Sebastian in South America, his picture will change expression depending on the action if the game, usually a small smile or a small frown. If he makes at least 10 points on one turn, he will give a big grin.
*****SPOILERS****
The following are the Hidden Quests for each Region. You only have to complete the Hidden Quest once in a Region, it doesn’t matter which Location you do it in. Remember that the Hidden Quest is always in addition to the other Silver Quest requirements for that location.
If you already cleared a location once for the Silver Quest and now you're going back through it to do the Hidden Quest, some Regions will require you to turn all the squares gold as well as doing the Hidden Quest to earn the Hidden Quest jewel, and some Regions will let you get by with just doing the Hidden Quest. If you're just trying to complete the Hidden Quest and the jewel is awarded, you can stop at that point if you prefer. However the safest strategy is just to always turn all the squares gold in addition to whatever else you're doing in that location.
Central America: Match 4 coins in a row, not just 3.
Iceland: Melt three ice blocks with a single warming jewel.
South America: Play your opponent to a tie. The easiest way is to wait until you are one move short of whatever the required winning score is for this Location. Then only make your matches over gold squares until your opponent catches up with you. When you each have one short of the winning score, you will have run out of spaces and the game will be a tie.
Europe: Exactly match your opponent’s first 3 moves. They have the same board layout you do. You can see their small board off to the side (but not the jewels on it). You just have to watch their move and try to copy it. You must do this 3 times and win the round to get the jewel. It will be probably be a little easier to do against Emma than against Hani, since Emma plays a little more slowly. Note that because of chain reactions one move may clear jewels in several directions, so watch carefully! You still have to match 3 moves in a row, regardless of how many jewels are cleared.
Africa: Make a horizontal match of 5 gold lion coins.
Oceana: Collect 150 silver coins in a single location.
North Pacific: You must solve a Silver Quest while allowing no more than 3 white pearls to fall off the edge of the board. Everything else is the same. This may mean that you will have to match pearls with each other to keep them from dropping to the edge. You don’t have to use exactly 3 pearls—you can use 0, 1, 2, or 3. Just don’t use more than 3.
China: Although the hints say “don’t let any monkeys escape,” the Hidden Quest is actually to complete the location without letting any monkeys fall off the bottom of the board. It’s OK if you put one in a cage and it escapes and then you put another one in that cage, as long as no monkey ever falls off the bottom of the board. You still have to do everything else for the location, including turning all the squares gold and filling all the cages with monkeys.